

Easy Cheesy Garlic Chicken Wraps: The Ultimate Quick Meal Recipe
Cheesy Garlic Chicken Wraps are a delicious and satisfying meal that everyone can enjoy. Whether you’re busy after a long day or hosting a casual dinner for friends, this dish has got your back. With its cheesy goodness and garlicky flavor, it’s a fantastic way to use leftover chicken. Plus, it’s incredibly quick to prepare, making it a go-to recipe for weeknight dinners or lunch on the weekends.
Why you’ll love this dish
There are countless reasons to whip up these Cheesy Garlic Chicken Wraps in your kitchen. First, they strike the perfect balance between flavor and convenience, making them ideal for those hectic nights when you need something quick yet crave something wholesome. They’re also budget-friendly, as the main ingredients are often staples you’ll find in your pantry. Kids absolutely love them—the melted cheese and savory garlic combine to create a taste that even the pickiest eaters will dive into with enthusiasm.
“These wraps are a total game changer for dinner. Quick to make, packed with flavor, and my kids are already asking for seconds!” – Happy Home Cook
The cooking process explained
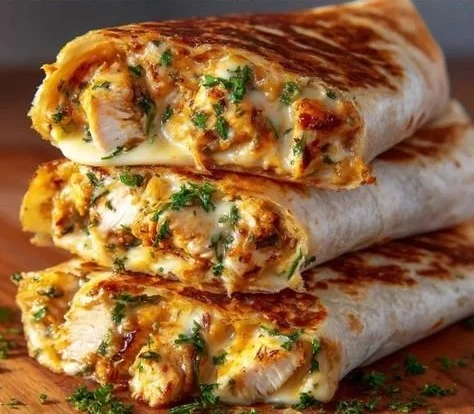
Making Cheesy Garlic Chicken Wraps is as easy as pie—well, actually, even easier than pie! The process is straightforward, so you won’t find yourself scratching your head in the kitchen. You’ll start by sautéing some garlic, mixing in shredded chicken and spices, and then assembling everything in large tortillas. After a quick turn on the skillet, your wraps will be golden brown and oozing with melted cheese. Follow these simple steps, and you’ll have a delicious meal ready in about 30 minutes.
What you’ll need
Before you begin, here’s a handy ingredient list to gather:
- 2 cups cooked chicken, shredded
- 1 cup shredded cheese (cheddar or mozzarella)
- 4 large tortillas or wraps
- 3 cloves garlic, minced
- 1 tablespoon olive oil
- 1 teaspoon garlic powder
- 1 teaspoon onion powder
- Salt and pepper to taste
- Fresh parsley, chopped (for garnish)
Feel free to switch up the cheese or even use a different protein if you’re feeling adventurous!
Step-by-step instructions
- Heat olive oil in a skillet over medium heat. Add minced garlic and sauté until fragrant.
- Stir in the shredded chicken, garlic powder, onion powder, salt, and pepper. Continue to cook until everything is heated through.
- Lay each tortilla flat and evenly distribute the chicken mixture among them.
- Sprinkle a generous amount of cheese on top of each portion of chicken.
- Tightly roll each tortilla to form wraps, making sure the filling stays inside.
- In the same skillet, place the wraps seam side down. Cook for 2-3 minutes on each side until they’re golden brown and the cheese is fully melted.
- Remove from heat, slice each wrap in half, garnish with fresh parsley, and serve warm.
Best ways to enjoy it
These Cheesy Garlic Chicken Wraps are incredibly versatile. They shine as a standalone meal but can be even better with a side of crispy salad or some spicy salsa for dipping. Consider serving them with homemade guacamole or a refreshing corn salsa to elevate your meal further. For drinks, a cool iced tea or soda pairs wonderfully.
Storage and reheating tips
If you happen to have any leftovers (though I doubt you will!), here’s how to keep them fresh. Store them in an airtight container in the refrigerator for up to 3 days. Reheat them in a skillet to preserve their crispy exterior or pop them in a microwave if you’re in a hurry, though the texture may not be as crisp that way. For longer storage, consider freezing wrapped but unheated! Just be sure to wrap them tightly in plastic wrap and foil.
Helpful cooking tips
To enhance your Cheesy Garlic Chicken Wraps, consider adding a splash of lemon juice to the chicken mix for extra flavor. For those who like a bit of a kick, add some crushed red pepper flakes or diced jalapeños to the filling before rolling them up. Another tip: don’t shy away from using a variety of cheeses for a gourmet flair—think pepper jack or gouda!
Creative twists
Want to switch things up? Here are some variations to try:
- Use cooked bacon or chorizo alongside or instead of the chicken.
- Add sautéed spinach, bell peppers, or mushrooms for extra veggies and flavors.
- Swap in whole wheat or spinach wraps for a healthier take.
- Top with avocado or your favorite hot sauce for an extra zesty experience.
Common questions
What can I use instead of tortillas?
If you’re looking for alternatives to regular tortillas, consider using lettuce wraps for a low-carb option or gluten-free wraps if you’re avoiding gluten. Pita bread is another tasty substitute that adds a unique twist!
Can I make these wraps ahead of time?
Absolutely! You can prepare the chicken mixture in advance and store it in the fridge. Just assemble the wraps and cook them when you’re ready to eat. This is a fantastic time-saver!
How do I make these wraps vegetarian-friendly?
To go meatless, you could replace the chicken with sautéed vegetables like zucchini, mushrooms, and bell peppers or use a meat alternative such as shredded jackfruit or tofu.
How long do leftovers last?
In the refrigerator, leftovers should be consumed within 3 days, while frozen wraps can last for about 1-2 months. Just reheat them thoroughly before enjoying!
What’s the best way to reheat leftovers?
For the best results, reheat your wraps in a skillet rather than the microwave. This will help maintain their crispiness while fully melting the cheese again.
Can I use other types of cheese?
Definitely! Cheddar and mozzarella are classic choices, but feel free to get creative. Cheese blends or even cream cheese can work wonderfully for a rich, gooey texture.
Is this recipe kid-friendly?
Yes, kids typically love these wraps! Their cheesy interior and customizable flavors make them perfect for families.
Can I add more spice to my chicken mixture?
Absolutely! If you enjoy a bit of heat, add hot sauce or spices like cayenne pepper or smoked paprika to the mix before cooking. Just adjust according to your taste preferences!
By exploring these Cheesy Garlic Chicken Wraps, you’re not only satisfying your hunger but also indulging in a meal that brings the whole family together.

Cheesy Garlic Chicken Wraps
Ingredients
Main Ingredients
- 2 cups cooked chicken, shredded
- 1 cup shredded cheese (cheddar or mozzarella)
- 4 large tortillas or wraps
- 3 cloves garlic, minced
- 1 tablespoon olive oil
- 1 teaspoon garlic powder
- 1 teaspoon onion powder
- Salt and pepper to taste
- Fresh parsley, chopped (for garnish)
Instructions
Preparation
- Heat olive oil in a skillet over medium heat. Add minced garlic and sauté until fragrant.
- Stir in the shredded chicken, garlic powder, onion powder, salt, and pepper. Continue to cook until everything is heated through.
- Lay each tortilla flat and evenly distribute the chicken mixture among them.
- Sprinkle a generous amount of cheese on top of each portion of chicken.
- Tightly roll each tortilla to form wraps, making sure the filling stays inside.
- In the same skillet, place the wraps seam side down. Cook for 2-3 minutes on each side until they’re golden brown and the cheese is fully melted.
- Remove from heat, slice each wrap in half, garnish with fresh parsley, and serve warm.


